- Admin
- #1
anthony
Founder
The following two issues are the largest two issues as found from discussion by license holders during the beta software testing stage.
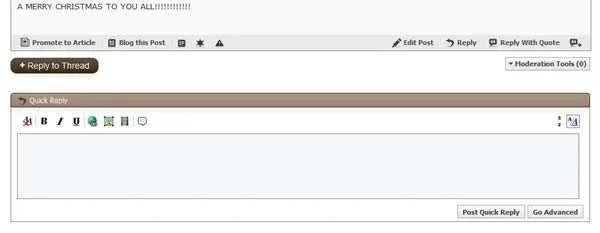
#1 - Getting To Advanced Editor From Thread
Technology evolves, thus sometimes little tricks appear that whilst provide simplicity, unfortunately create confusion when you go from an existing product to a new one.
When you view a thread, you presently have a button to go to the "advanced editor" if you require further editing options in your post. The new forum version has no such button, instead, you have to double click the "+Reply To Thread" button.
Single clicking it will take you to the quick reply box. Double clicking it will take you to the advanced editor.
Link Removed
#2 - The Attachment Manager
This is the largest issue for user experience in the coming upgrade. No longer do you have just an upload box when uploading images, but instead you have an attachment manager for each user. That means, for every image you upload, it is now stored in a unique folder off your own. Each time you open the attachment manager, you will be able to view all your current uploads, assign them into multiple threads / posts / blogs / articles, etc. Basically, once you upload and use an image anywhere on the site, that image is then always accessible to you too use again. If you upload an image and choose not to use it, or delete the thread, post, blog, etc, then the image will delete itself from the server.
That is a rough behind the scenes view, now to see.
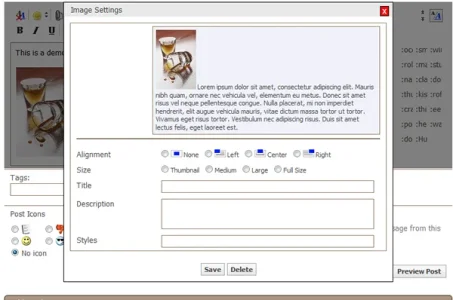
There are two ways in which to attach images, then you have many ways in which to edit them for display. Much more functionality, though very confusing often to those less web savvy / software savvy folk.
Link Removed
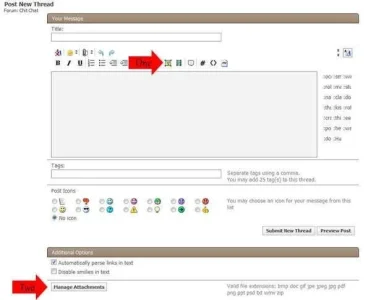
You have two different methods to attach images.
One - This is available to add an image as basically as possible. This is the method available within the toolbar of quick reply, blog, etc.
Two - This is the full attachment manager option that allows drag and drop, adding, etc.
Method One
A popup appears with the following, to upload from your computer or from a URL.
Link Removed
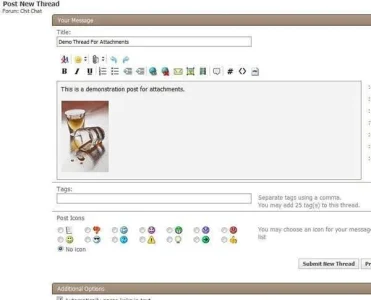
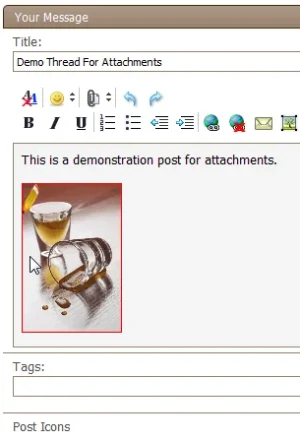
This is pretty straight forward. You find the file on your computer from "Browse" click open then upload it. The file will then insert itself as an image into your post as per below. The inserted image will view as a thumbnail size, though we will get to editing this later in the discussion.
Link Removed
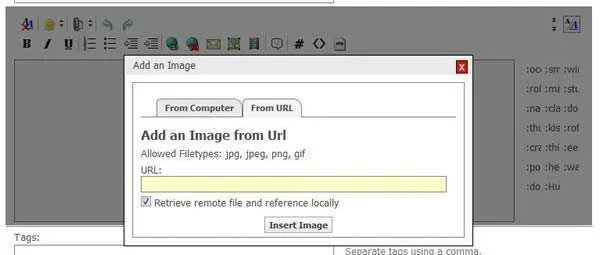
The second option to insert from a URL looks like:
Link Removed
The same as above will occur when you insert the image. It will not attach to the bottom, but it will insert within the post itself. This option relates if you have a third party account, photobucket or such, and want to include an image. By leaving the box ticked to retrieve the remote file and reference locally, it means that ptsdforum grabs the file and saves it locally to ptsdforum, thus when the page is loaded, the page doesn't stop whilst having to retrieve a file from a third party site. If you linked it from photobucket, as an example, and lets say photobucket was down, then the page wouldn't load until the error that photobucket was down completed... usually around the 30 second to minute mark. Not very healthy to achieve fast loading pages. So there would be zero requirement for any person to untick this option if using it. By allowing the software to store the file locally, means the page loads fast by only having to retrieve information from this server, not this and a third party server.
So... that concludes option one for placing images within posts. Again, this is the main option available through all toolbars and pages, and by far the easiest.
The next post goes into option two and editing images inline.
#1 - Getting To Advanced Editor From Thread
Technology evolves, thus sometimes little tricks appear that whilst provide simplicity, unfortunately create confusion when you go from an existing product to a new one.
When you view a thread, you presently have a button to go to the "advanced editor" if you require further editing options in your post. The new forum version has no such button, instead, you have to double click the "+Reply To Thread" button.
Single clicking it will take you to the quick reply box. Double clicking it will take you to the advanced editor.
Link Removed
#2 - The Attachment Manager
This is the largest issue for user experience in the coming upgrade. No longer do you have just an upload box when uploading images, but instead you have an attachment manager for each user. That means, for every image you upload, it is now stored in a unique folder off your own. Each time you open the attachment manager, you will be able to view all your current uploads, assign them into multiple threads / posts / blogs / articles, etc. Basically, once you upload and use an image anywhere on the site, that image is then always accessible to you too use again. If you upload an image and choose not to use it, or delete the thread, post, blog, etc, then the image will delete itself from the server.
That is a rough behind the scenes view, now to see.
There are two ways in which to attach images, then you have many ways in which to edit them for display. Much more functionality, though very confusing often to those less web savvy / software savvy folk.
Link Removed
You have two different methods to attach images.
One - This is available to add an image as basically as possible. This is the method available within the toolbar of quick reply, blog, etc.
Two - This is the full attachment manager option that allows drag and drop, adding, etc.
Method One
A popup appears with the following, to upload from your computer or from a URL.
Link Removed
This is pretty straight forward. You find the file on your computer from "Browse" click open then upload it. The file will then insert itself as an image into your post as per below. The inserted image will view as a thumbnail size, though we will get to editing this later in the discussion.
Link Removed
The second option to insert from a URL looks like:
Link Removed
The same as above will occur when you insert the image. It will not attach to the bottom, but it will insert within the post itself. This option relates if you have a third party account, photobucket or such, and want to include an image. By leaving the box ticked to retrieve the remote file and reference locally, it means that ptsdforum grabs the file and saves it locally to ptsdforum, thus when the page is loaded, the page doesn't stop whilst having to retrieve a file from a third party site. If you linked it from photobucket, as an example, and lets say photobucket was down, then the page wouldn't load until the error that photobucket was down completed... usually around the 30 second to minute mark. Not very healthy to achieve fast loading pages. So there would be zero requirement for any person to untick this option if using it. By allowing the software to store the file locally, means the page loads fast by only having to retrieve information from this server, not this and a third party server.
So... that concludes option one for placing images within posts. Again, this is the main option available through all toolbars and pages, and by far the easiest.
The next post goes into option two and editing images inline.